
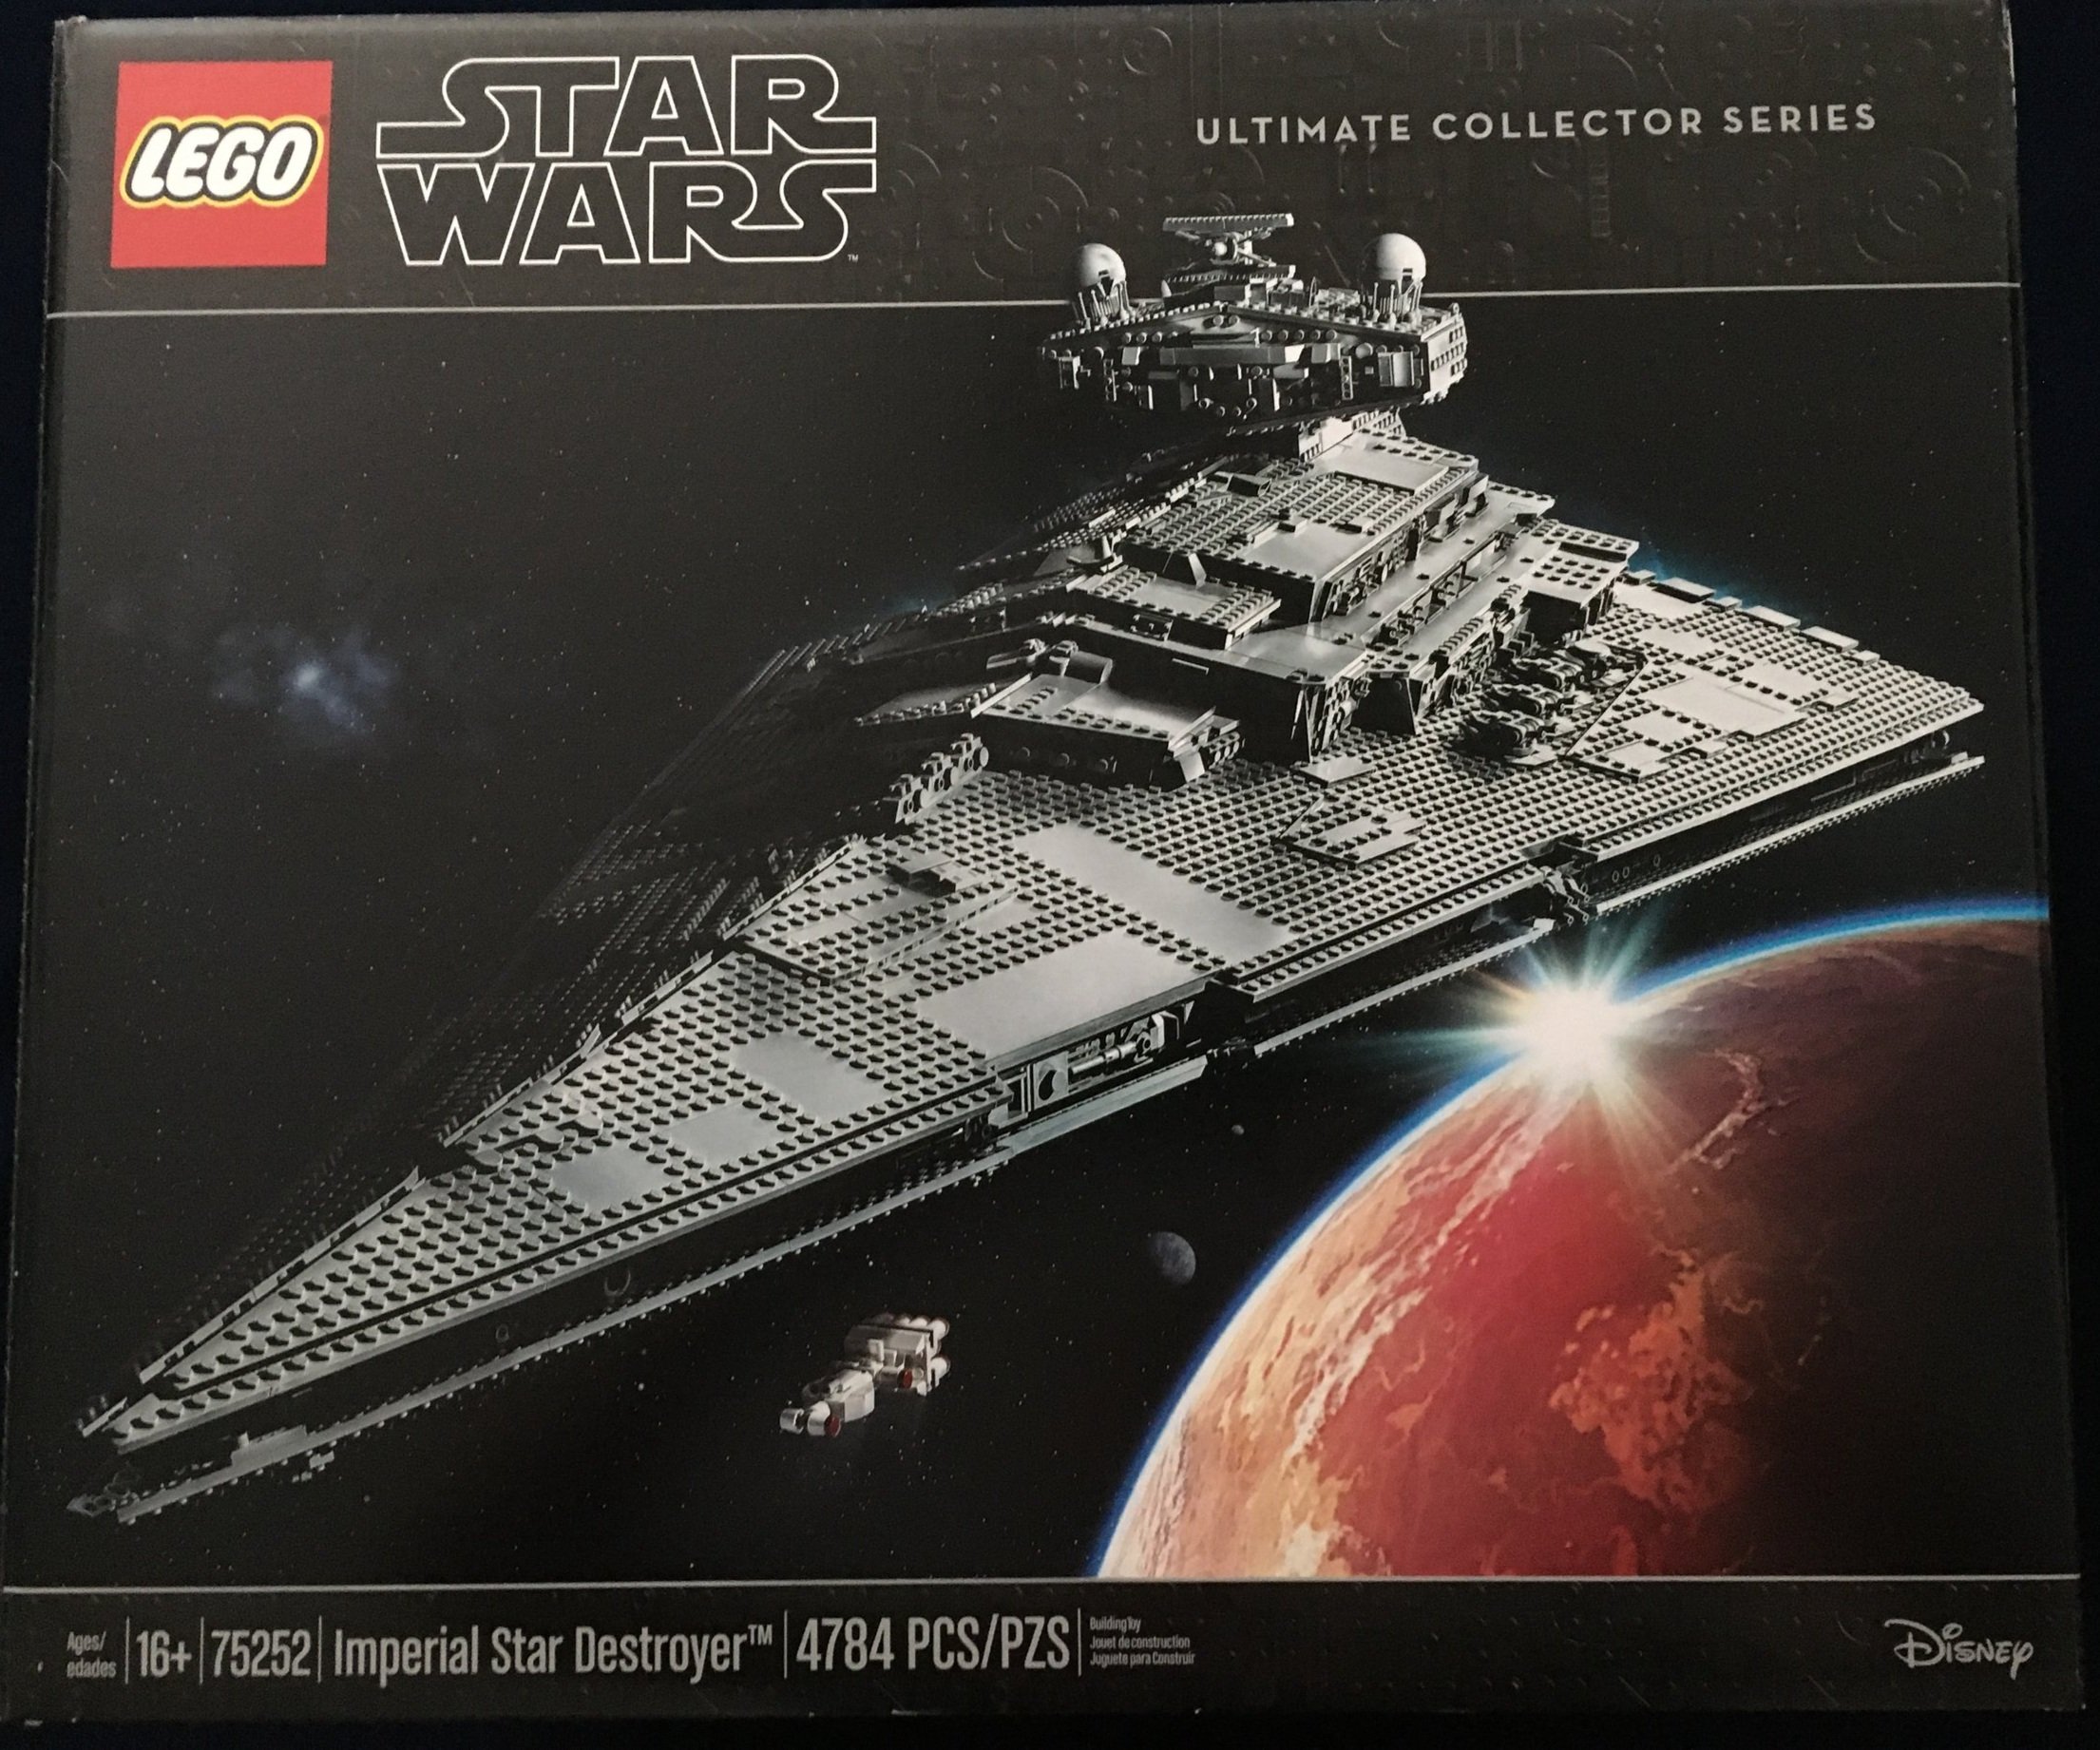
Just in time for the next giant Star Wars UCS set to be announced, I’m releasing my set review of the previous one. #75252-1: Imperial Star Destroyer was released back on 1 October 2019 in the US. It retails for $699.99 and contains 4,784 pieces. This makes it $0.146 per piece this is quite high in my opinion. Usually, with such a large set containing so many pieces, they can get it lower, but part of it has to do with the number of large plates in this set. There’s a lot of plastic in there despite the smaller piece count as compared to #75192-1: Millennium Falcon.
I’m finally getting to the review on this one. I actually purchased it back in April 2021. Then I moved and it moved with me still in the box. I finally opened it in late September 2021 and finally got to finish building it during the beginning of November 2021. Most of the time I spent building it was bringing the instructions and a small table outside to watch my kiddos play with their neighbor friends. Lots of questions about what I was building and if they could help. “No thanks. I got it!”
Onto the review…
So it comes in a sturdy box made great to fit the next box. The box with the set box inside is similar to other large sets I have purchased in the past with the LEGO branding. The set box is well protected inside which is as it should be considering the price of this set. From the label, my set was made in Mexico in April 2021. Not bad considering I also purchased it in April.


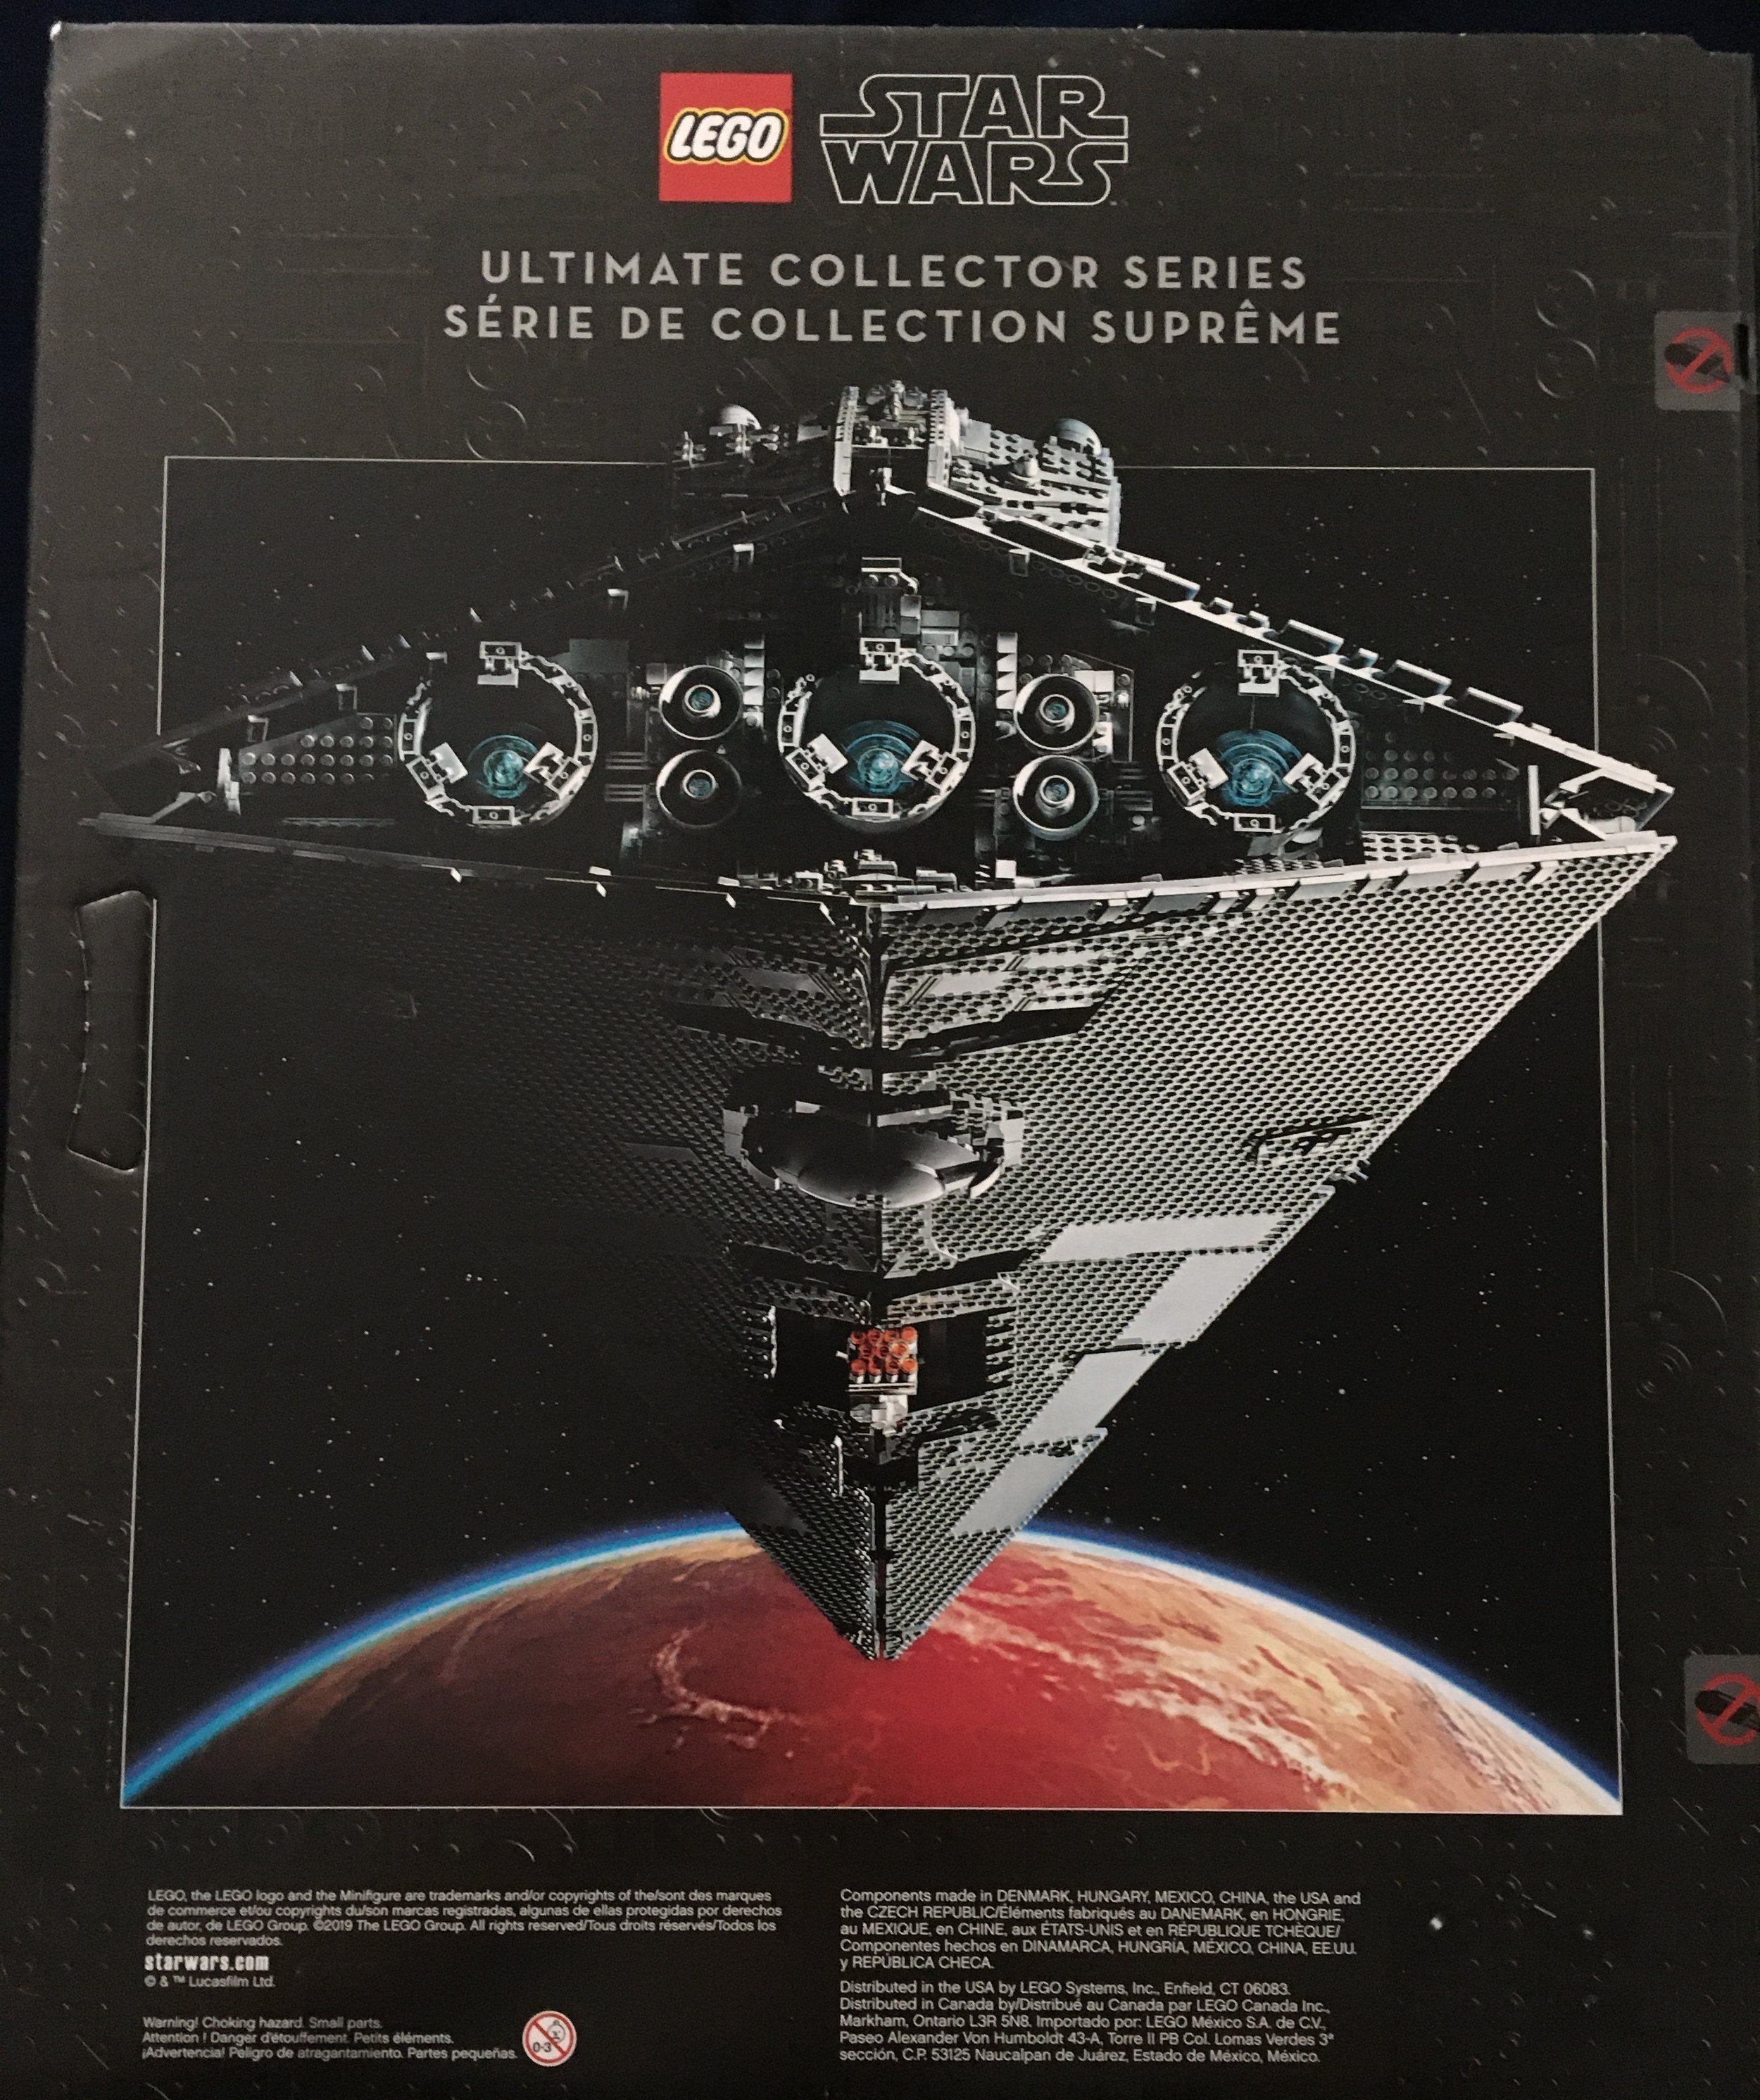
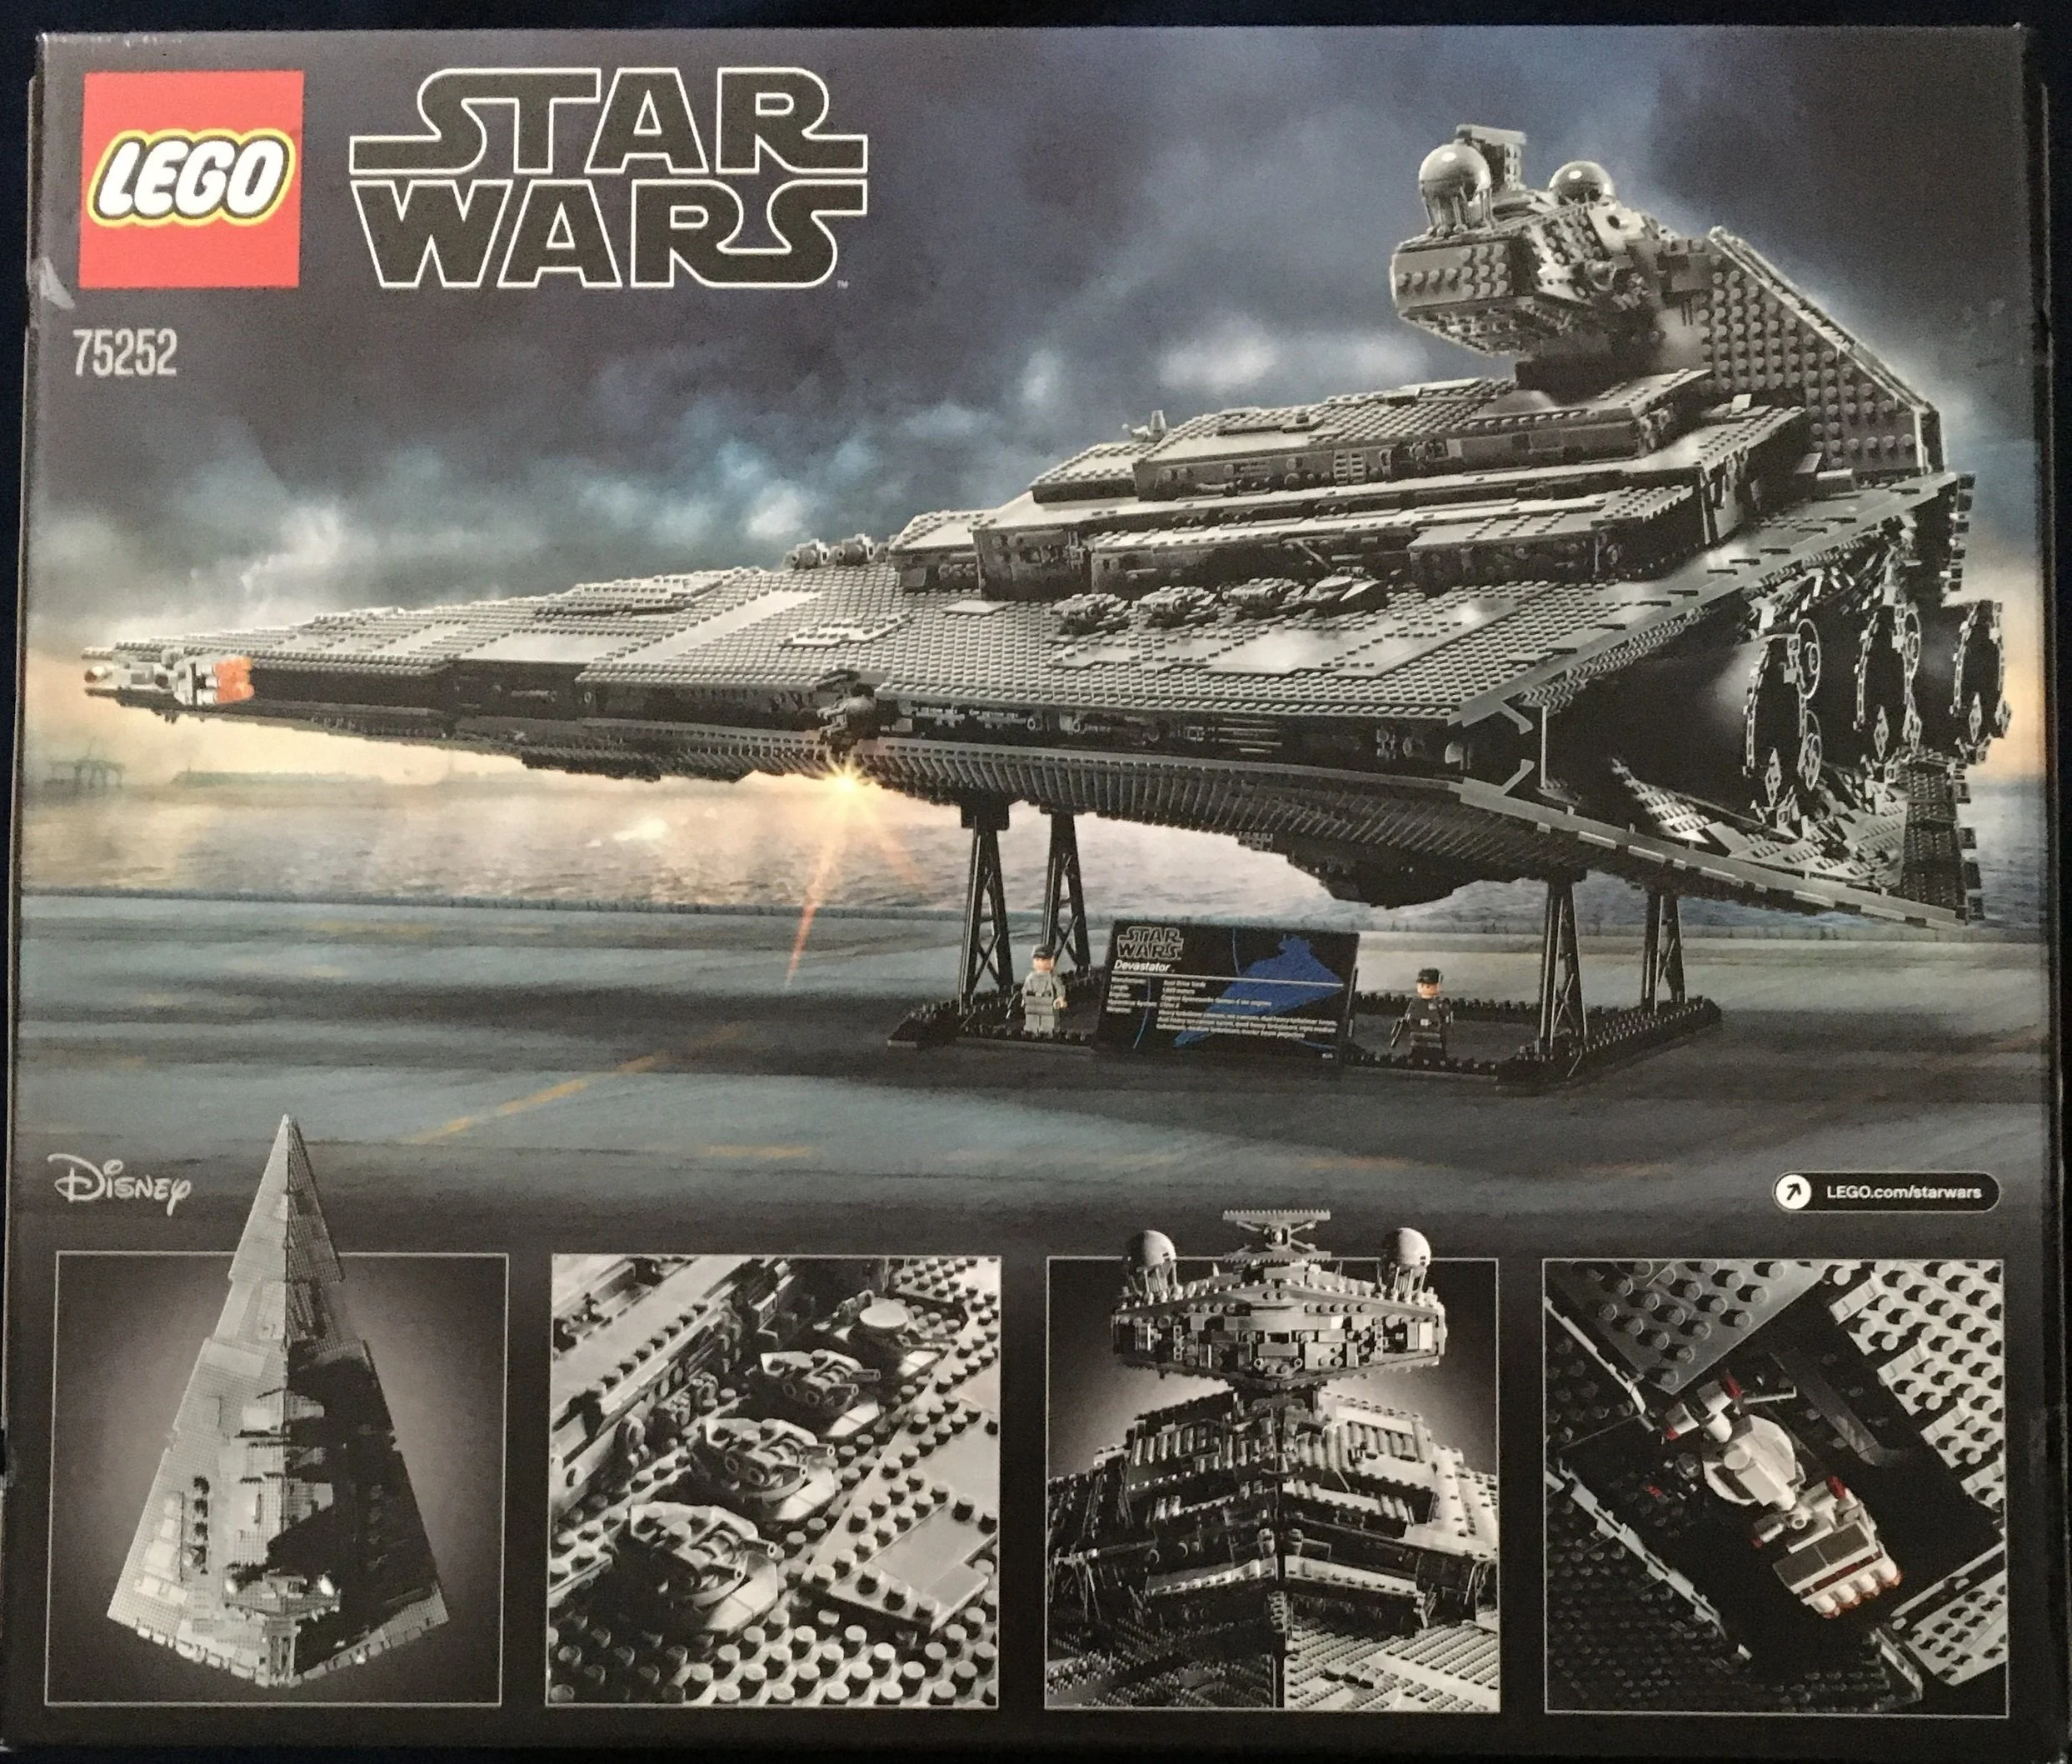
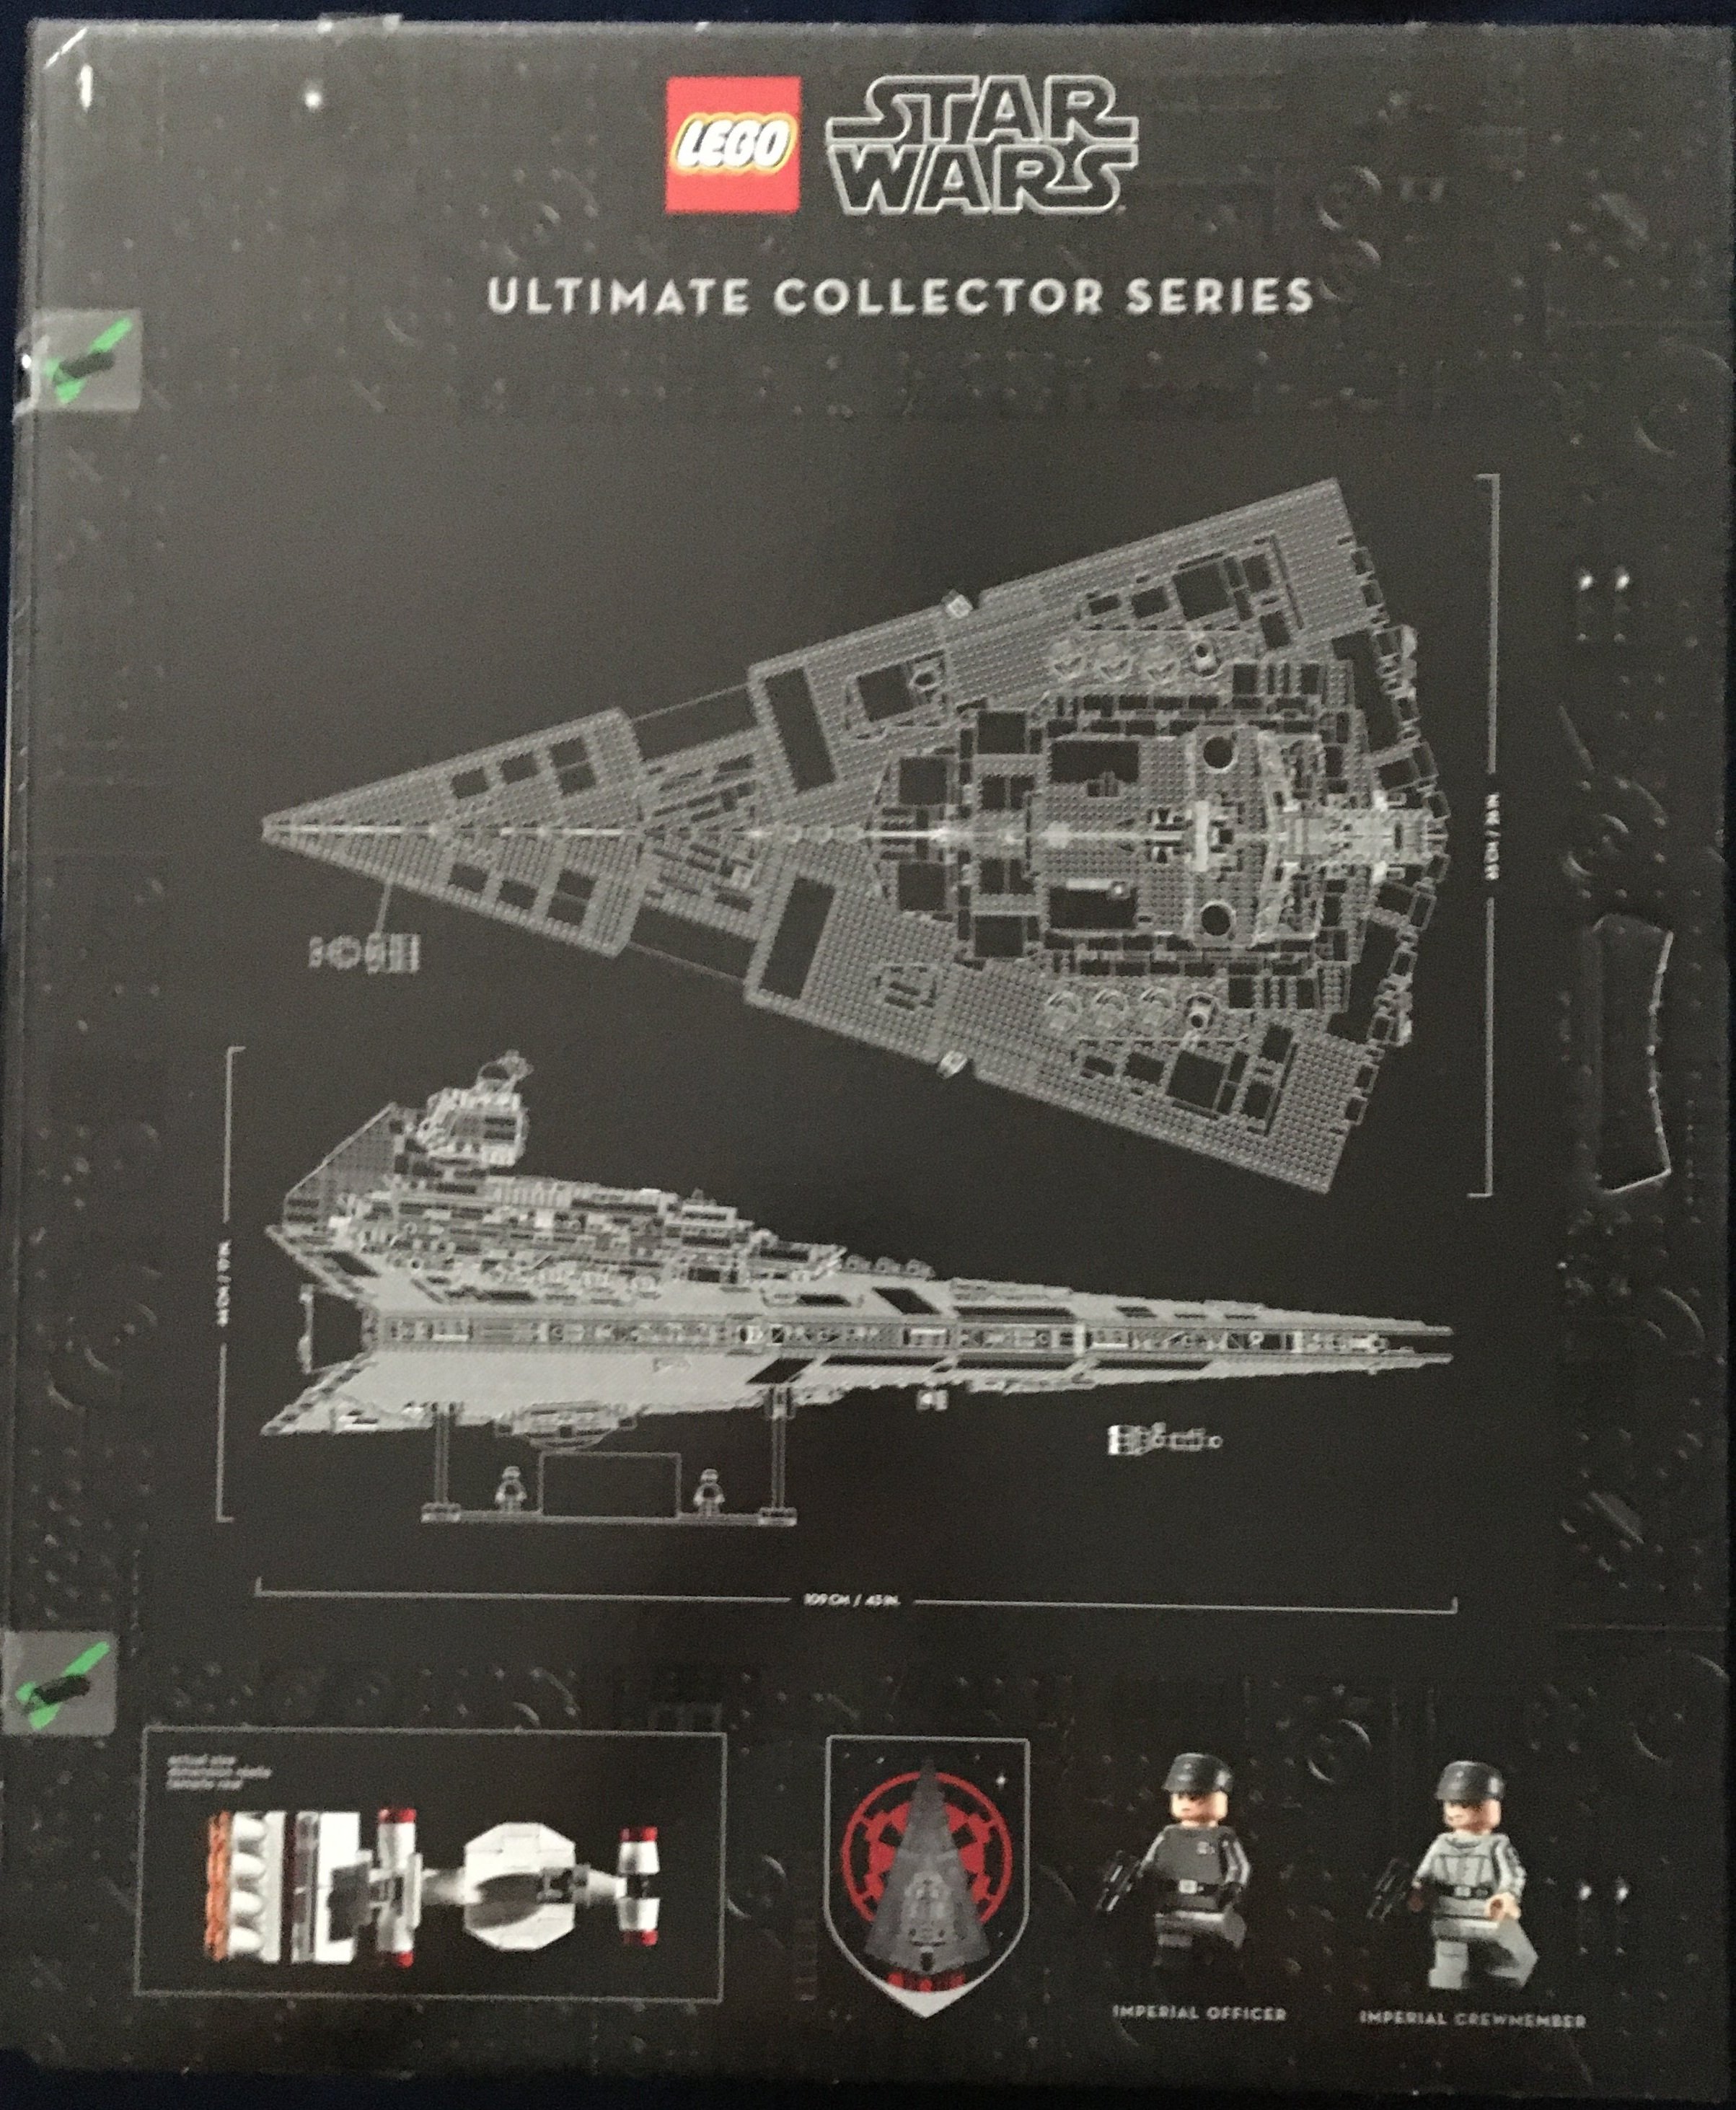
Here’s the set box with some of the art work. It has some great artwork of the set with different backgrounds. You can see just about every side of the set and the minifigures. You also get a computer generated outline of the ship (on one of the box flaps) which shows the dimensions of the set (43 inches long, 17 inches tall, 26 inches wide). You also get them in metric for those of you not familiar with inches.

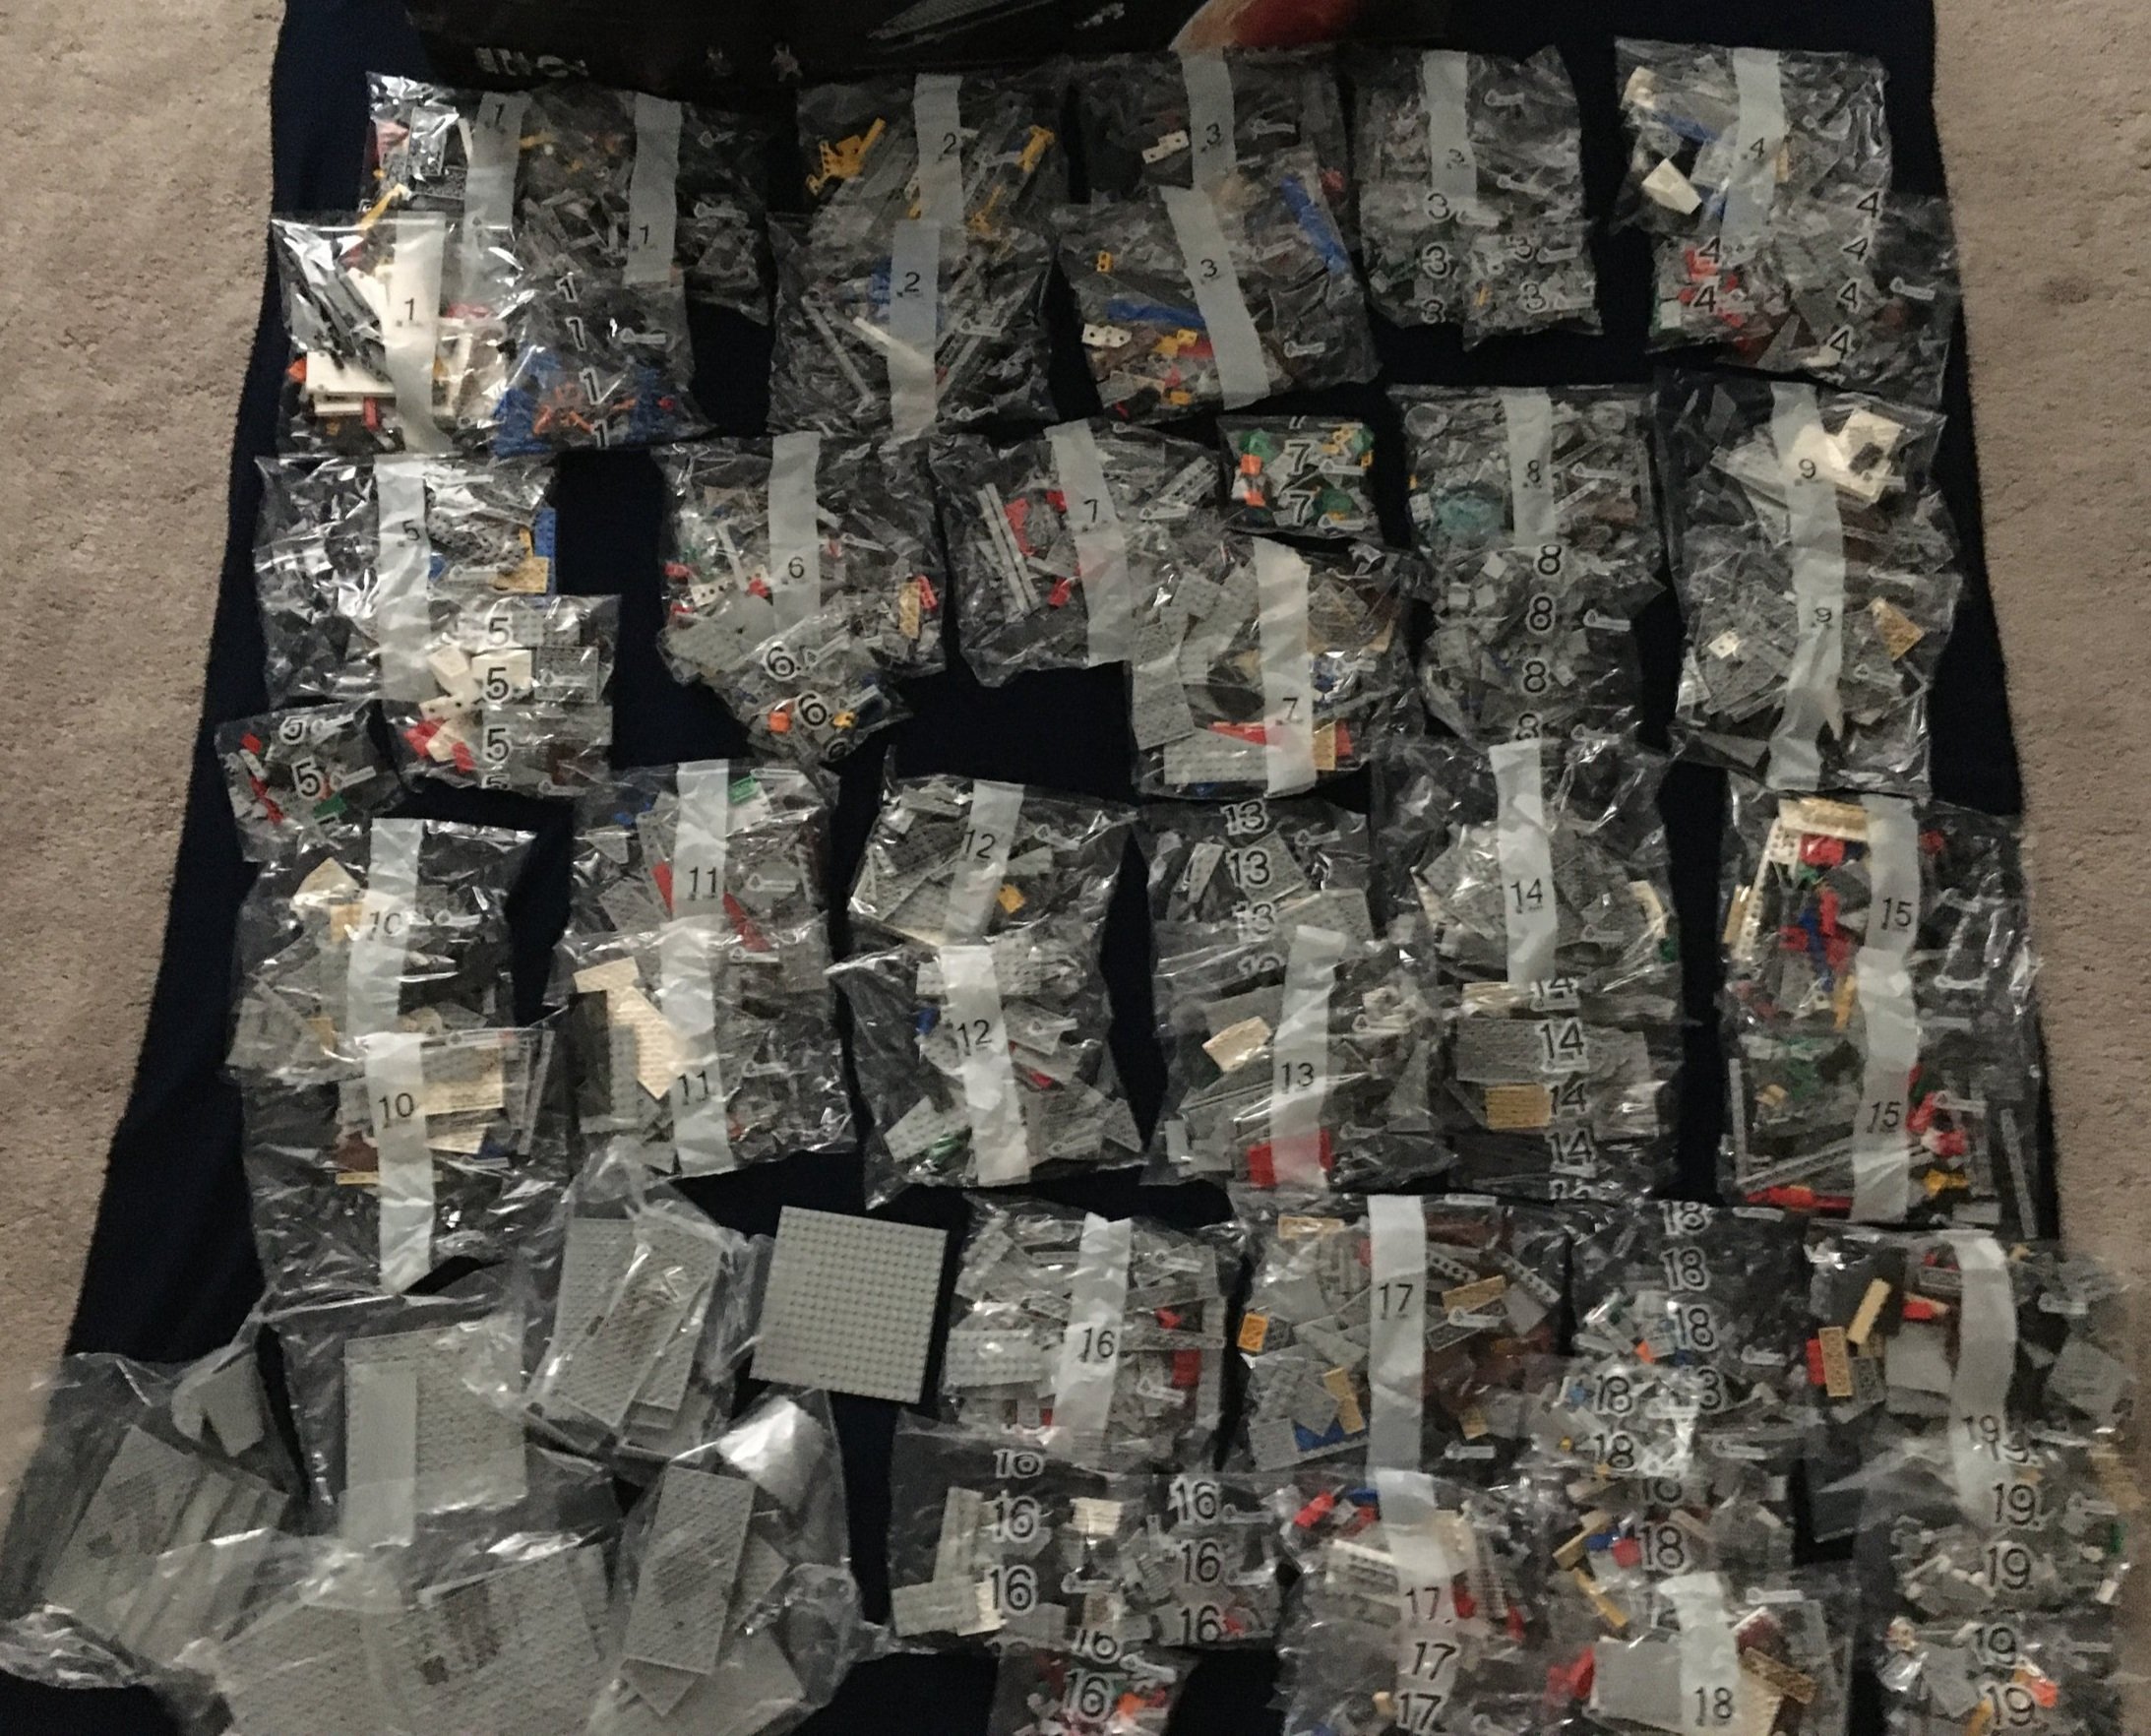
Inside the box are four parts boxes and a box with the instructions. Each box has some artwork of the set. I like how the instructions come in a box versus a bag. I didn’t like that the boxes weren’t numbered. You have to sort through the boxes to put the parts bags in order and then if you don’t have the space like me, you have to sort them back into boxes. There are 19 numbered parts bags and then a few bags with larger plates. There are also a few plates not in any bags. Sorry, I didn’t count the total number of bags. You’ll have to zoom in on my picture to try and count them all.

The instructions come in a large, heavy book bound with wire. Inside are some details on the set, designers, and LEGO Star Wars.


Only one sticker on this set. It’s the large label for the description plate. I don’t like these large stickers, but I can’t complain since it is the only one.

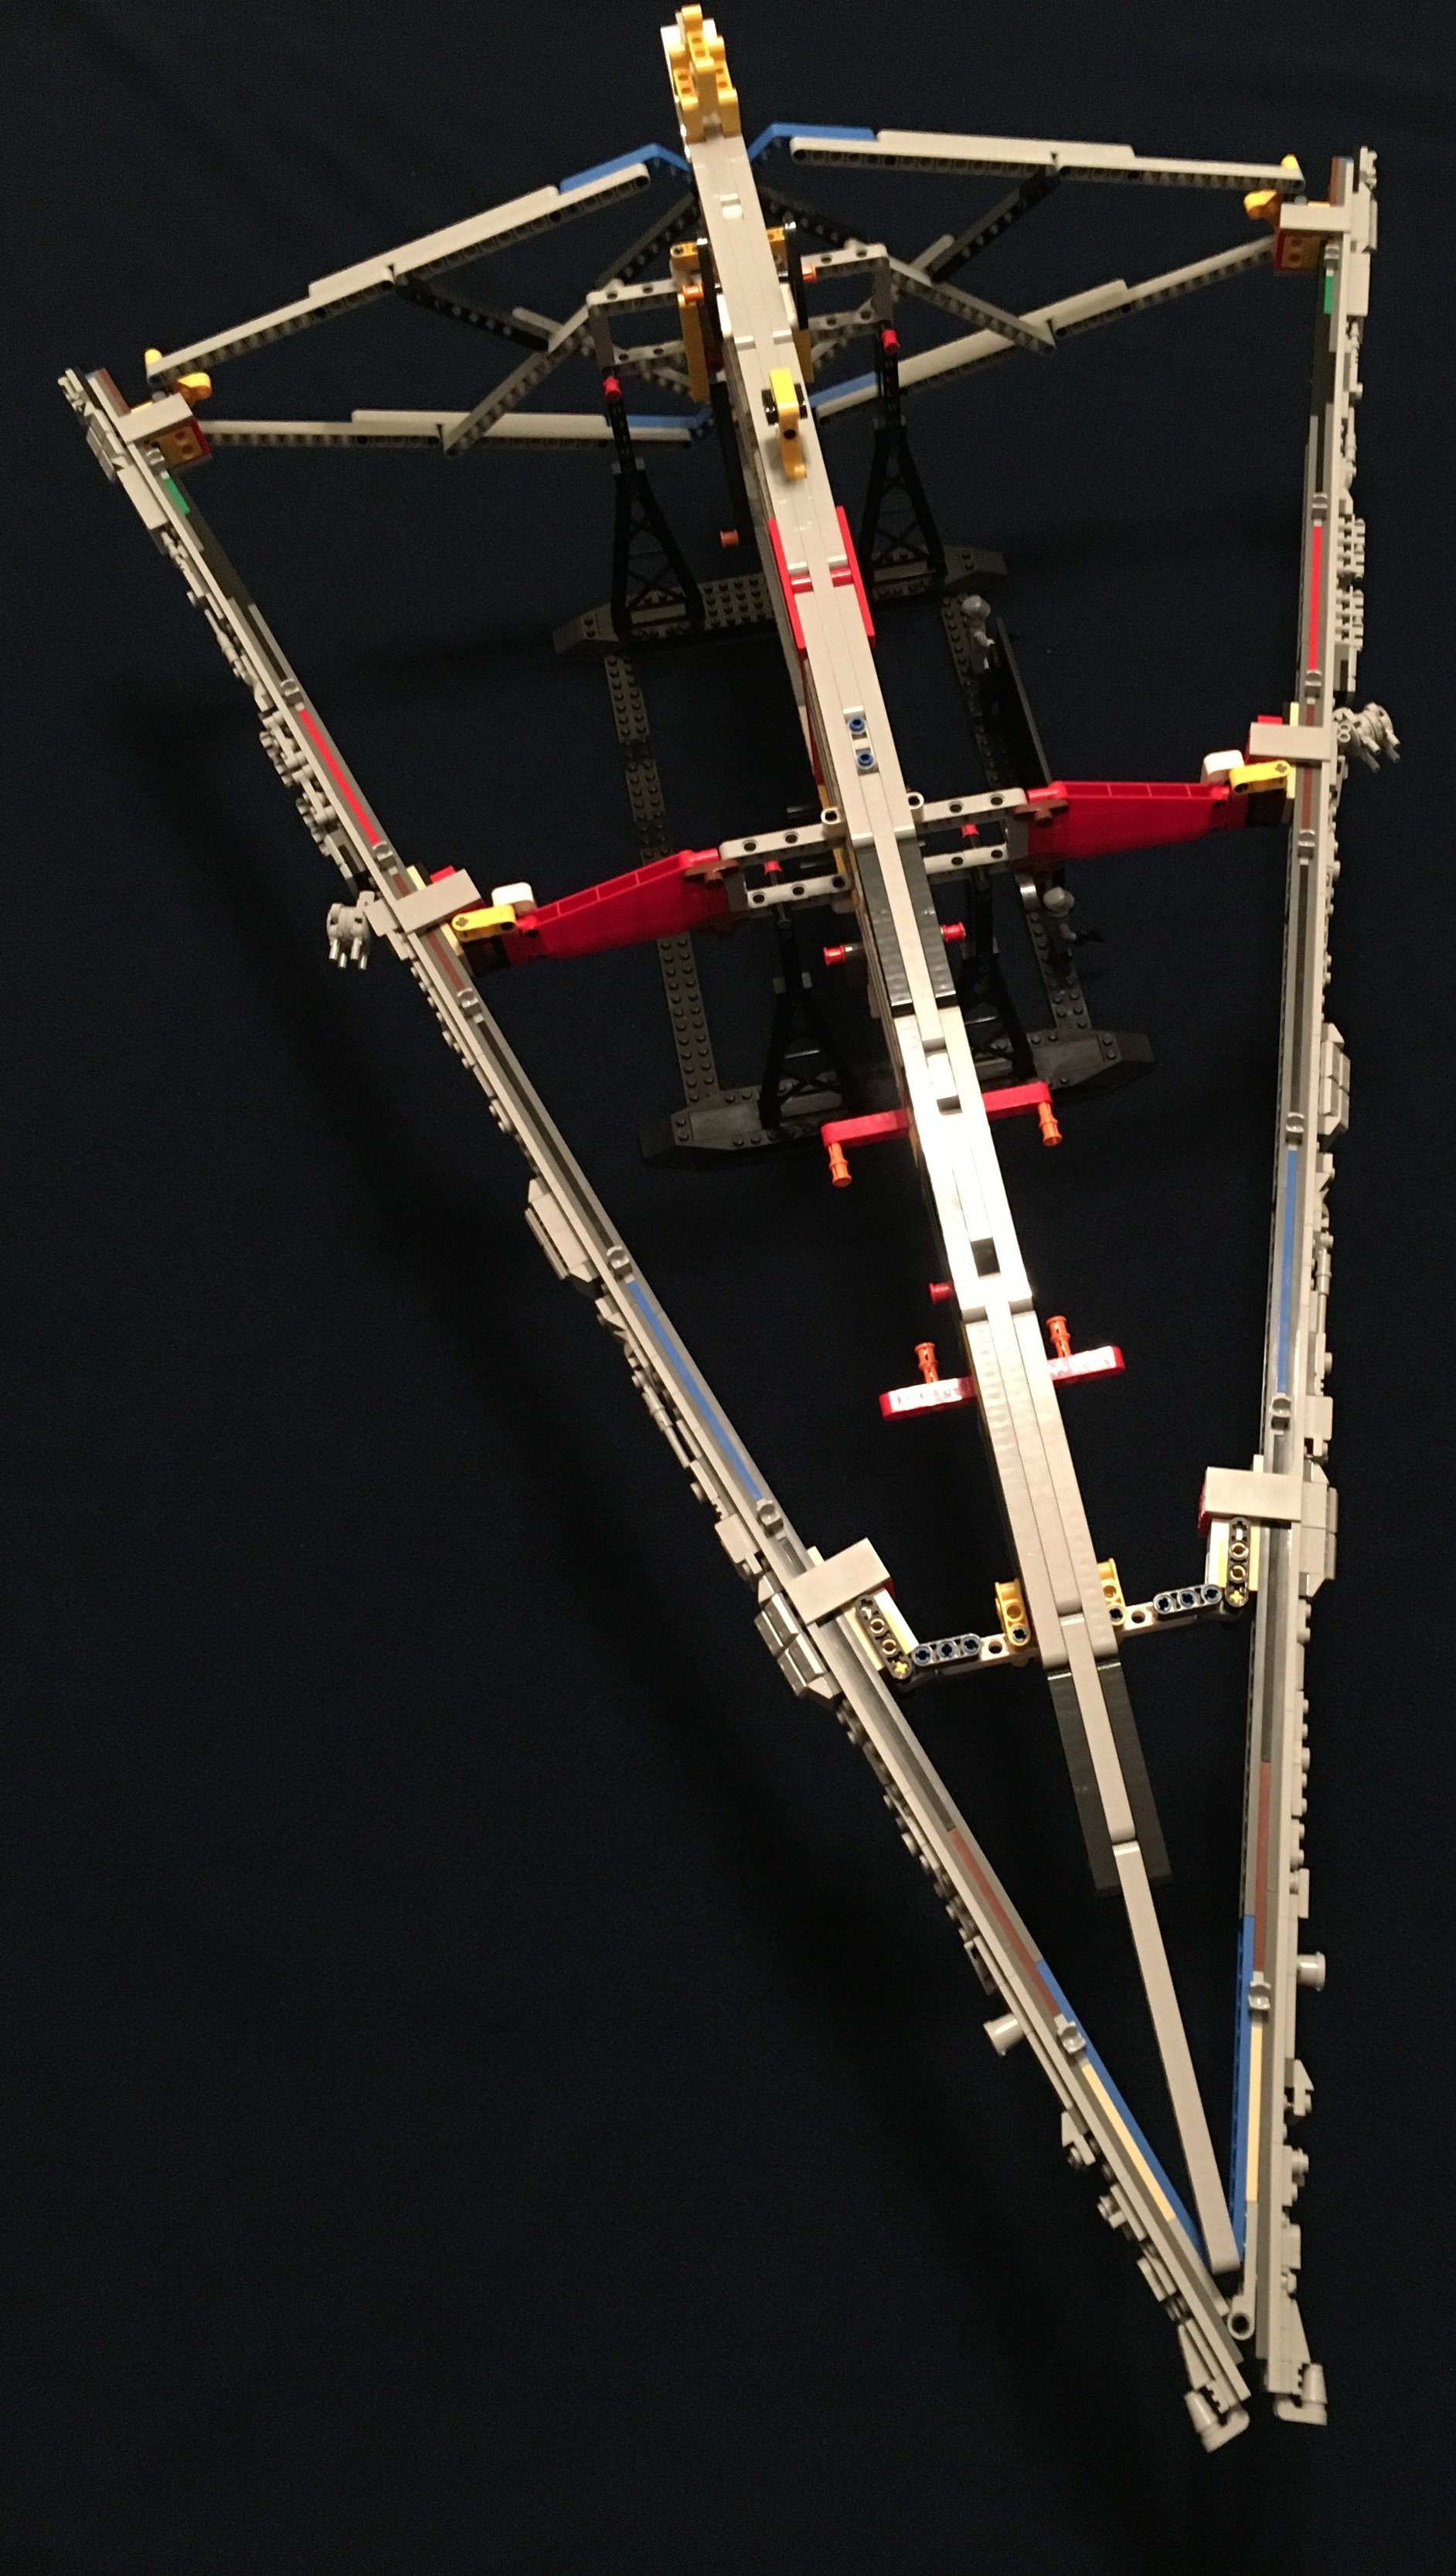
The build for this set starts off with a pretty sturdy Technic structure. If you’re not a Technic fan, then this part will not be enjoyable, but I’m always amazed how people can use Technic pieces to put things together and then how they can connect them to System parts.
You’ll also notice the stand below the structure, the description plate, and the two minifigures. Building the stand first definitely helps make the build go easier as you have something to hold it up as you go versus building it later.
As for the minifigures, there were a lot of complaints when this set came out about just having two and how they were just crew members and nothing special. I don’t buy giant sets like this to get minifigures. I do it because I want to assemble a large set. So no real complaints here.

The second set of bags continues the internal structure and you can see the form of the ship start to take place.

The third set of bags builds the side of the ship in the form of a long running plate with a lot of greebling on it. Each side is mostly the same, but just flipped upside down. It clips on pretty easily to the substructure.


The bags labeled four and five build the underside skin in the back on the left and right. Lots of stacking plates together. This is where the build can get somewhat uninteresting as you are just connecting lots of plates together. Then you duplicate it only in a mirror image on the other side. The good part is on the inside of the ship, there are some different colors to mix things up a big.


The sixth bag adds some of the various bays underneath the ship and then a… um… I’m not an expert so I’m not sure what my last picture is… The middle one contains a small Tie Fighter. It also has a hook up where you can connect the Tantive IV as was done in “A New Hope.”


The seventh set of bags starts to build the back of the ship where the engines are located. This part was a bit more exciting to build as it wasn’t just stacking plates on top of each other.
Side note… this build is so big that I couldn’t use my normal low-grade picture taking method of just using the box as a background on a flat surface. So I found a low-tech program to crop out some of the background. It’s not the greatest, but it gets rid of a lot of the clutter in my building area that distracts from the set itself.

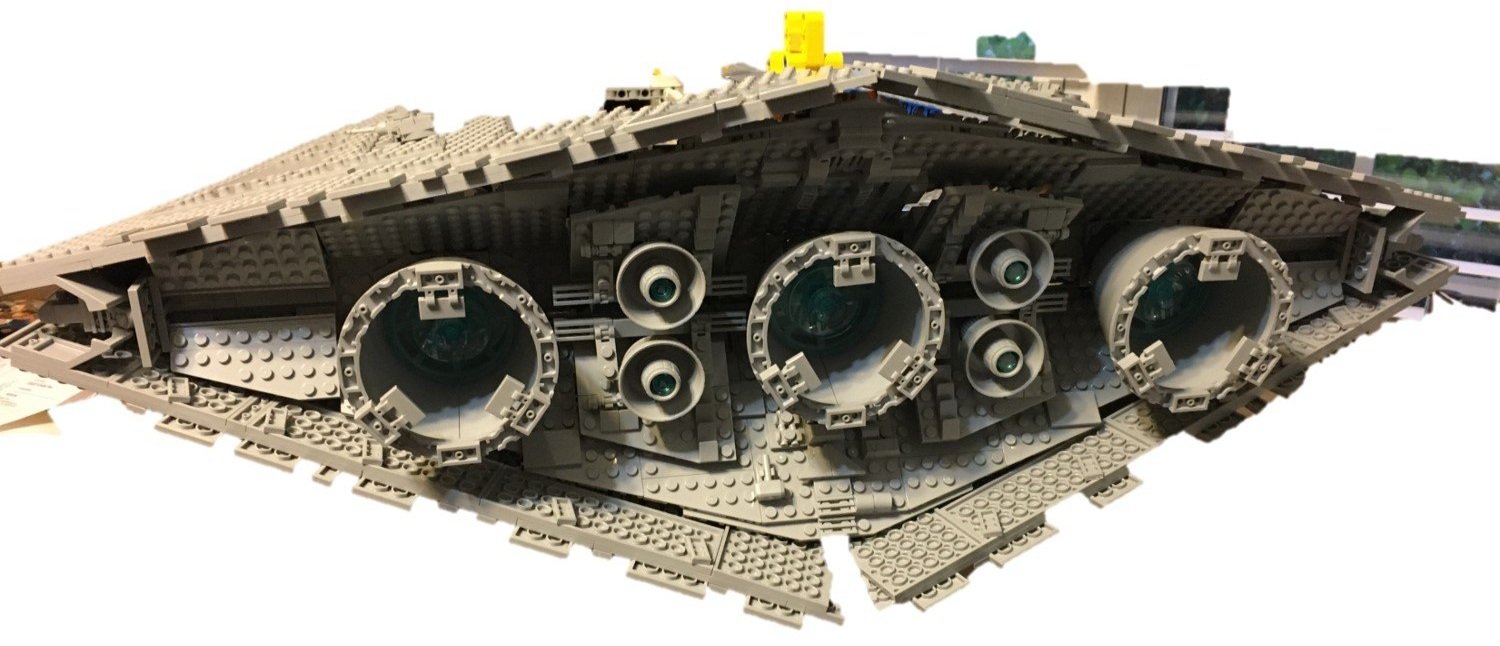
The eighth set of bags finishes up the back with the engines and adds a small amount of color in. If I wanted to dump more money in, I could get LED lights to light them up which I think would look cool. For now, I’ll stick with it as is.
Bags nine and ten finish up the front of the ship on the bottom. You build both sides. It is more stacking plates next to each other.

Then when you are done with that, you can move onto bags 11 and 12 with the top front.

Bags 13 and 14 build the left and right sides of the back of the shop on the top. This part was a little more involved as there is some minor greebling and there are some of the gun ports. Each gun is on a swivel and you can angle the turrets on each one. This is a nice touch to a ship devoid of many play type features.
Bag 15 builds the sub structure of what will become the bridge. You get to build with some color other than gray which is nice and it is more than just stacking plates.
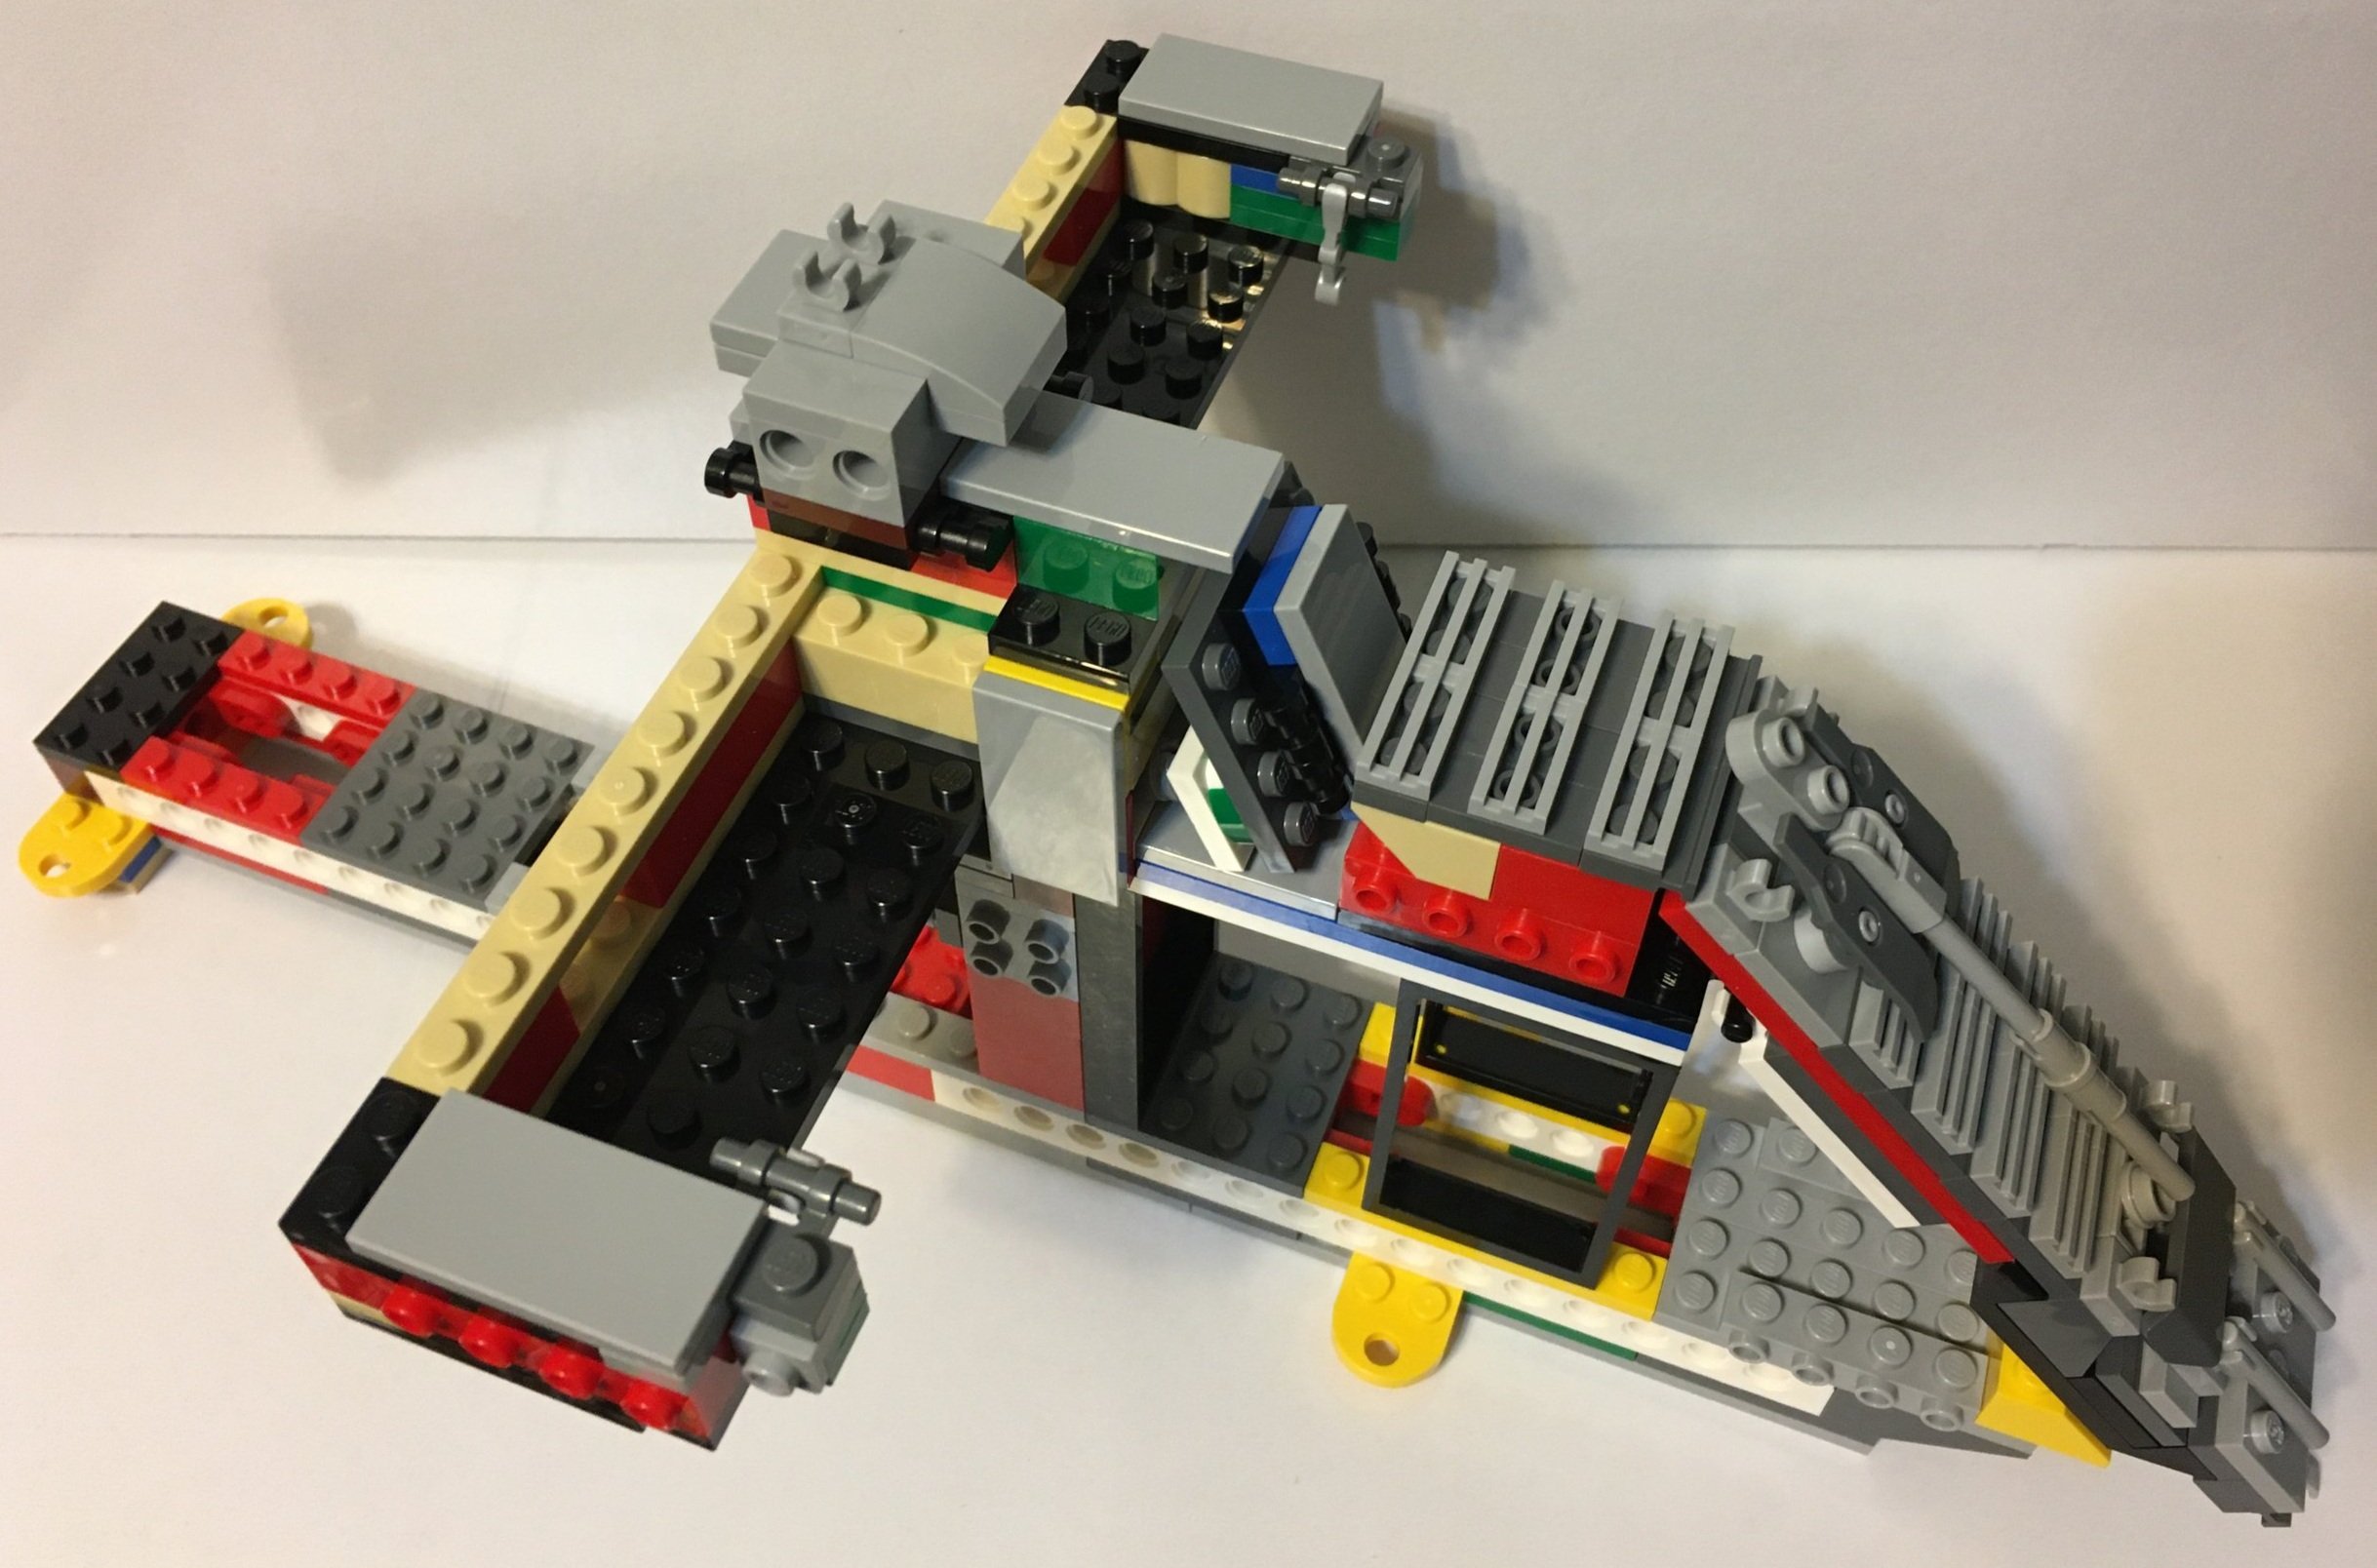
Bag 16 finishes up the bridge portion. I failed to take a picture of it alone, but you can see part of it in these pictures and then more in the final versions. I like the large balls on either side which I assume are some sort of radar or sensor. There is some good detailing in my opinion as compared to the ships you see in the movie.
Bags 17 and 18 build up the layer on the top of the ship and surrounding the bridge area. I’m sure someone can tell me what they are meant for, but this section was a change of pace. There were some plates to connect, but a lot of details, some use of SNOT techniques, and lots of greebling to add in detail. Each one just snaps/slides into place like much of the rest of the build for easy assembly/disassembly.


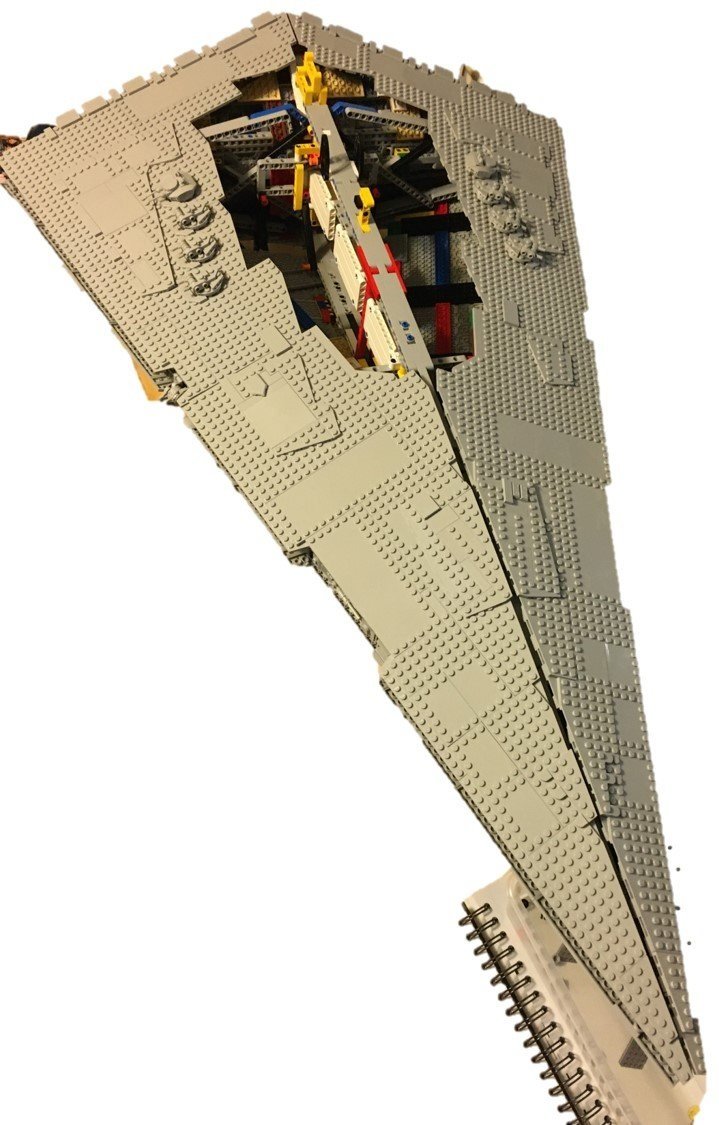
Bag 19 wraps everything up with two attachments that clip onto the previous build to wrap up the top of the ship. The attachments are with Technic pins so you can easily unclip to get to the substructure inside the ship. The nice part about this build is that you can move the set by holding onto the structure inside. It makes it easier to move as compared to the Falcon. I assembled it in one place and then moved it to take pictures and then moved it to a shelf for display. I was a little nervous it would break, but it held up okay.
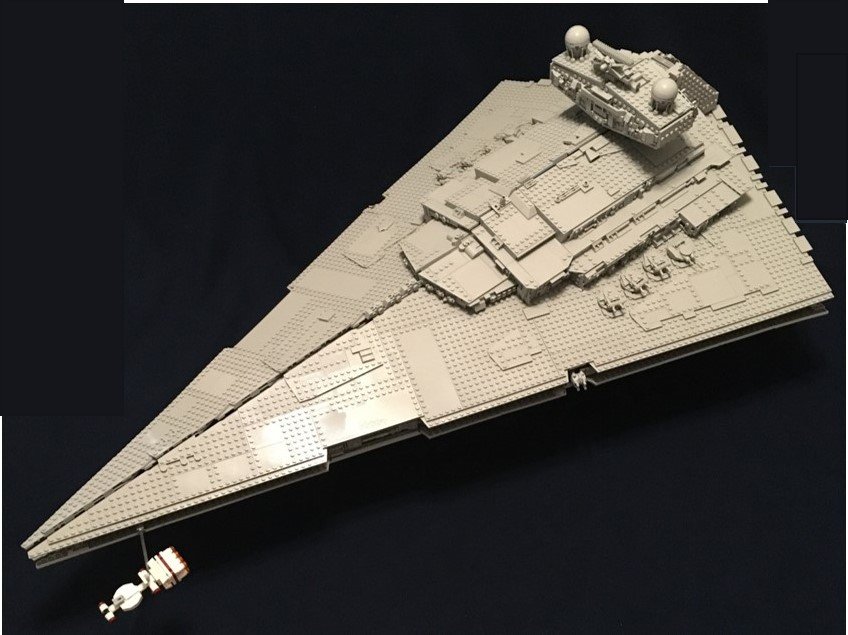
So here’s the final build from a few angles. Sorry for my crappy graphics editing program to cut out some of the clutter in the background. Maybe I just need to stick to reviews of smaller sets to avoid this problem in the future.
Bag 19 also builds a small version of the Tantive IV so you can re-create the scene from “A New Hope.” The small model is pretty accurate considering the scale and you can attach it with either the clear pole and clip as shown or it also clips into the bay on the bottom of the Star Destroyer. This is a cool feature in my opinion.


Overall, I thought the build was okay. The use of the Technic core was great, but there’s only so much excitement you can get from connecting plates into bigger plates. I think the end set captures the ship quite accurately and I like the shear size of this monster. There were some complaints about the line up the center between the two sides of the ship. I can see why people would complain, but I understand it is LEGO and there is only so much you can do.
The price is pretty steep considering the number of pieces, but you do get a pretty large beast of a set. If I can remember back that far, I think I purchased it during a double VIP point period. Hopefully you can find a deal or some way to cut back on the price to swallow the cost. Has anyone been able to get it at a discount?
Lastly, here’s where I’m displaying it for now. My NLS got some shelves and let me put sets on the tops. I’ve got #75308-1: R2-D2 and then #75192-1: Millennium Falcon. The two big builds look good together I think. Not sure if I will add an AT-AT in there or not. We’ll have to see.
Happy building!
